In part 1, we discussed the complex nature of sprinting and why it’s necessary to go down each and every rabbit hole in your attempt to take the complex nature of sprinting, and make it simple.
Here in part 2, we’ll get into how I view the movement of elite sprinters and what that means for how we should train our baseball athletes.
The Feet
Have you ever noticed just how little the foot actually touches the track in elite sprinters? It’s quite incredible.
De Grasse seems to float along the track, yet his coach Dan Pfaff has made it clear multiple times that De Grasse does very little heavy lifting, if any at all. Where does he get his strength from?
Function of the Foot
There are 3 arches of the foot: the transverse arch which runs from your first to your fifth metatarsal, the medial arch which runs from your first metatarsal to your calcaneus, and the lateral arch which runs from your 4/5th metatarsals to your calcaneus.

Together, these three arches form the base of your foot. When working properly, and when aligned with proper positioning, they provide stability for the foot.
When the foot is structurally stable, it sets up stability and function further up the chain. Think about it like this: a trampoline that is well strung, void of weak or disconnected points, will provide a great deal of stability and springiness. On the other hand, if there is a section of the trampoline that comes undone, the whole system is affected. Springiness is lost and it takes much more effort to bounce to the same height.
Someone like De Grasse is able to move so effortlessly along the track because his support system is working properly. By taking advantage of all 3 arches of the foot, we provide a stable base the rest of the body can work off of.
Creating the arches
Adrian Barr has done some great work on properly activating all 3 arches. Much of what I’ll be talking about here has been taken directly from him. I would highly suggest you take a look at his website (barrunning.com), or give his instagram page a look (find it here).
Essentially, what we’re trying to do in order to activate the 3 arches is create tension between those 3 points that were discussed earlier (the calcaneus, 5th metatarsal, and 1st metatarsal). Here’s how:
1 – Observation: Take inventory of the current shape of your foot. This will provide insight into the arch/arches you may have a more difficult time activating and those which may come about a little easier. Just observing the shape of the foot is a good start. Take this picture for example:
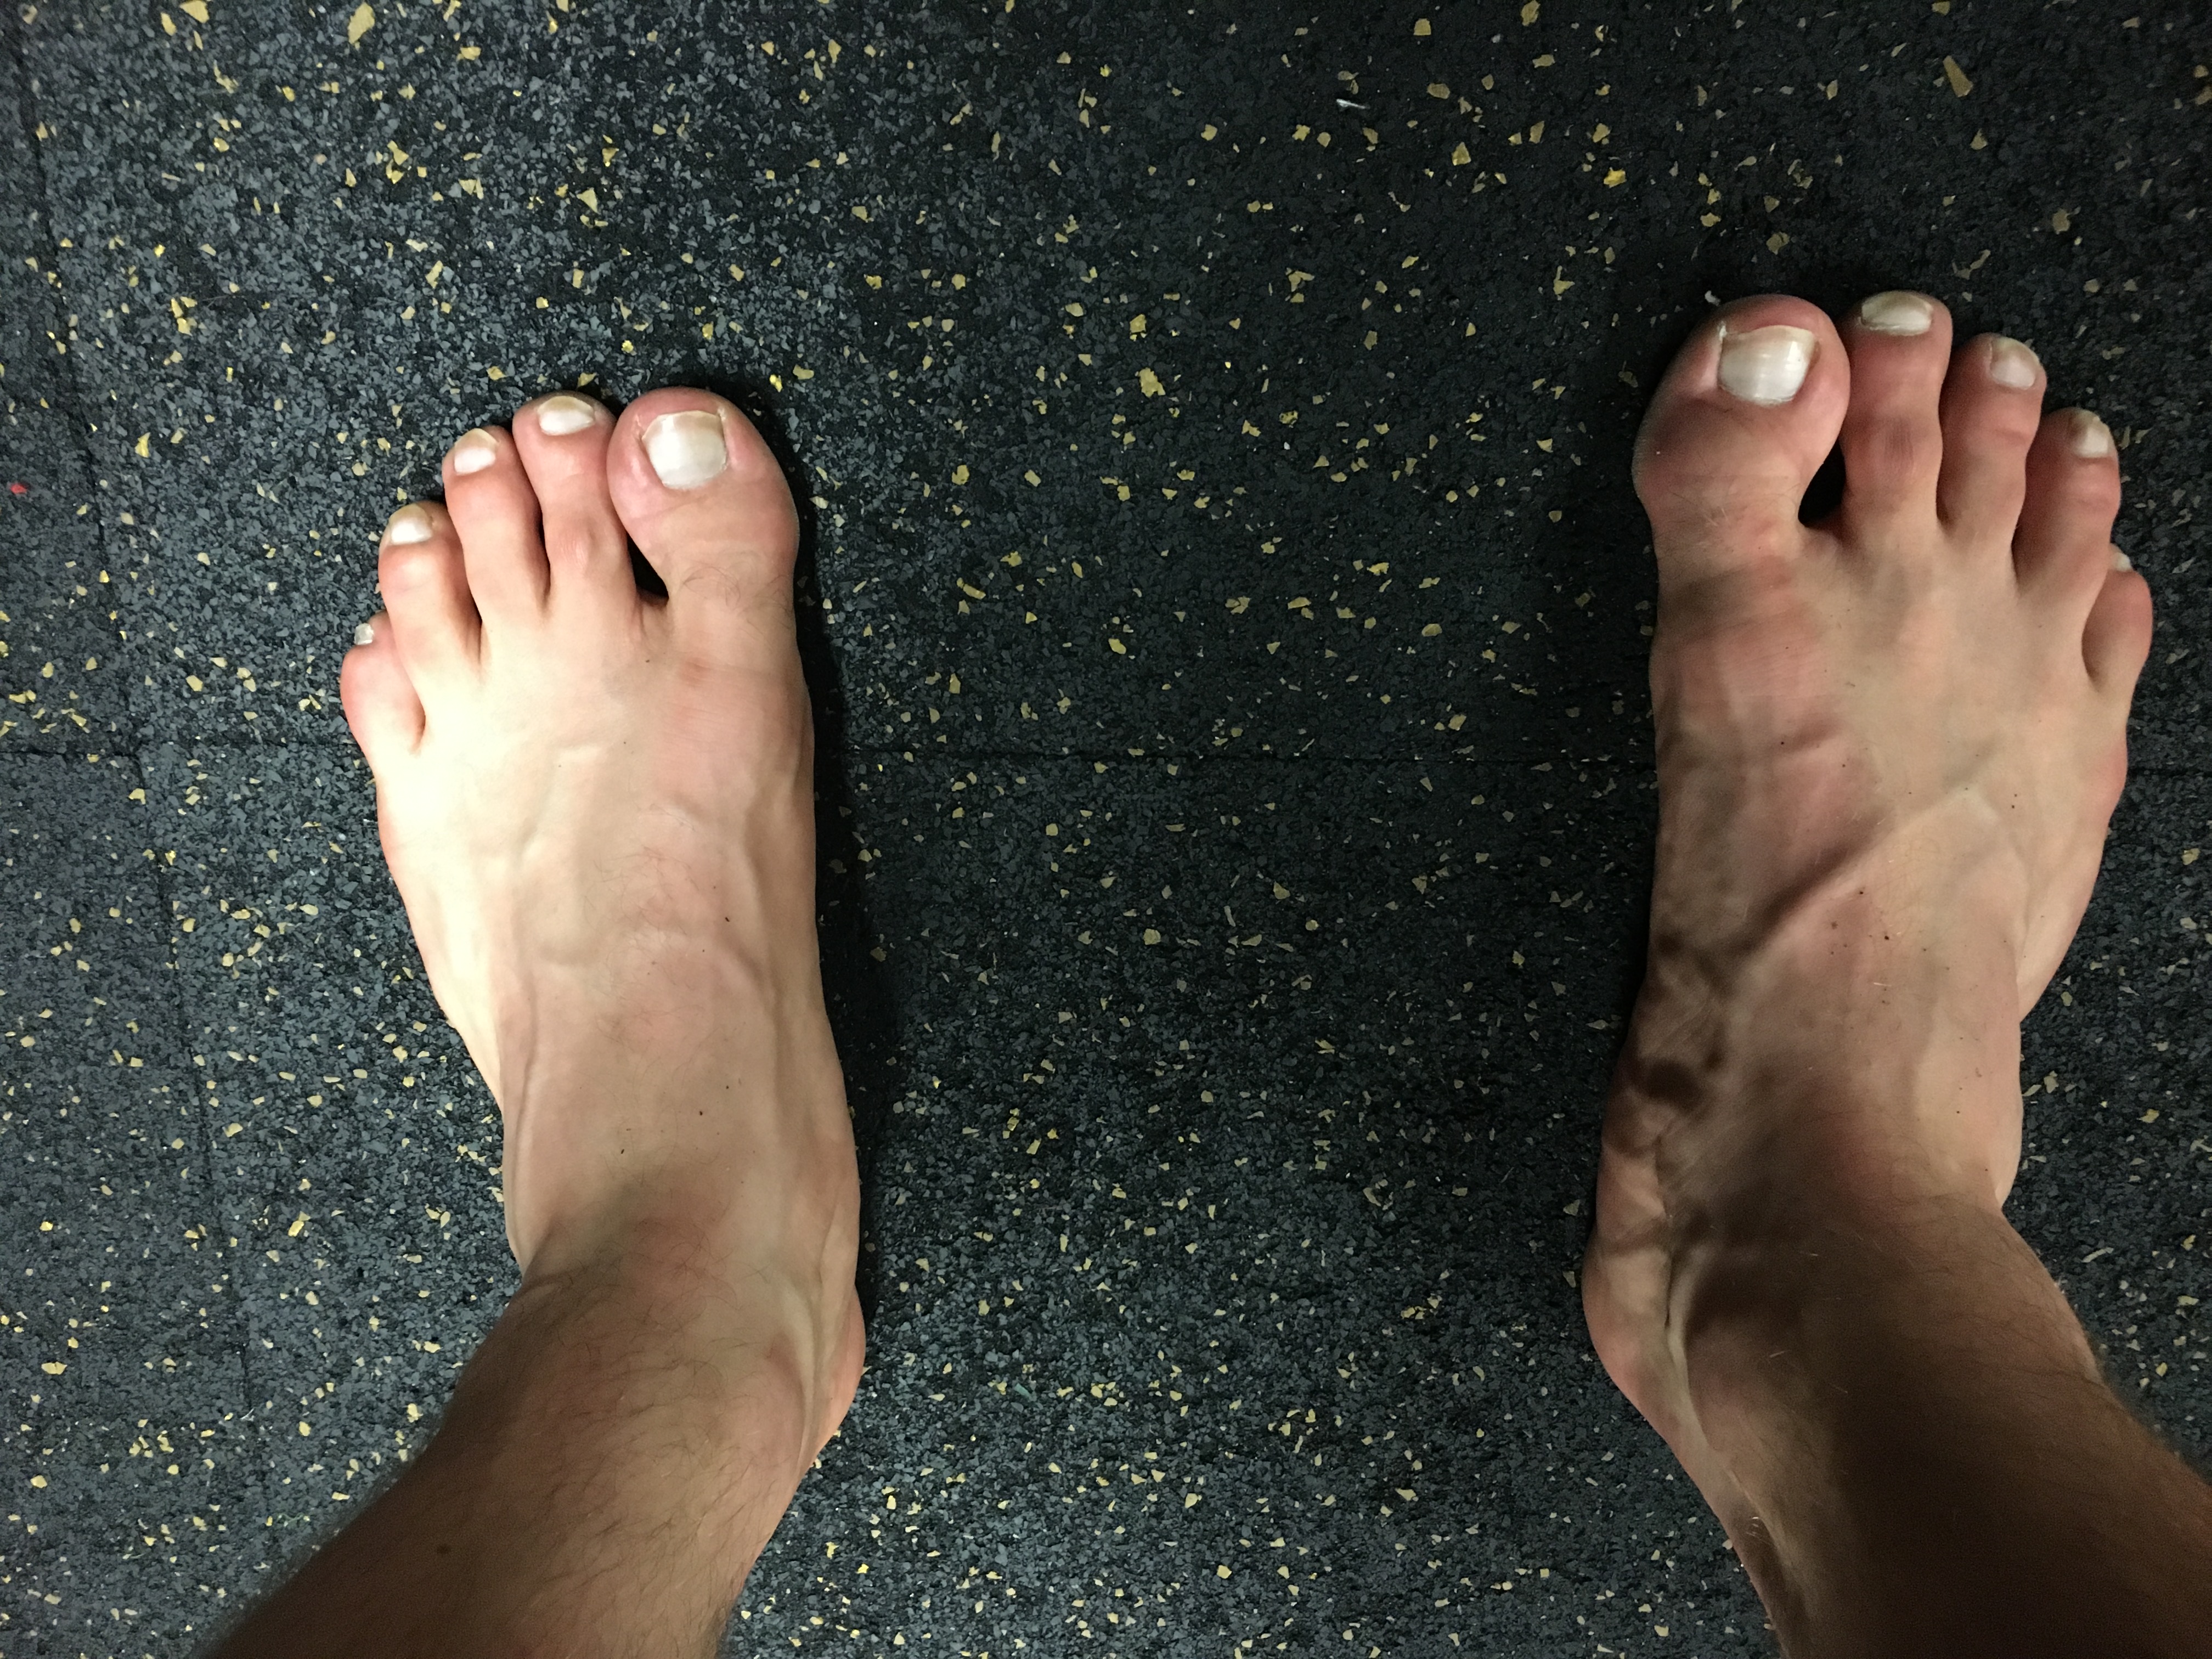
You’ll notice a couple key differences between the right and left foot. Mainly: the right foot is more venous, has a slightly higher arch, and has an inwardly angled big toe. Seeing these minor differences may be difficult in the beginning, but will get easier as you look at more and more feet. But its a vital piece of the sprinting puzzle. If an athlete has a difficult time creating one of the arches, it’s very likely you will see that issue show up in their sprinting. And while throwing cues at them like “get your knees up” can be effective in some cases, if their foot isn’t working properly to allow them to create the movement you want, your cues will be in vain.
2 – Action: Now that you understand the structure of the foot a little bit deeper, we can work on creating the arches. I explain how to do so below:
Now that we’ve taken function of the foot into account, we can move up the chain.
Utilizing Rotation
The fastest route from point A to point B is a straight line. Right?
Powell’s overall direction is no doubt straight, but understanding how he gets there is vital. We don’t see stiff and linear movement; Instead, we see a collection of moving parts that mesh together to propel Powell forward down the track. He’s utilizing the compounding effect of the rotational aspects of his joints to create stability and propel him forward.
We’ll break these movements down by looking at the swing leg side, the stance leg side, and how they complement each other to provide balance during all phases of the run.
Step 1
Here’s one cycle of the swing side leg, from Powell and Betts, both during their initial acceleration step:
Immediately after toe off we see the pelvis transitioning from free hip elevation (right side in Powell, left in Betts), to “new” free hip elevation. In other words the pelvis tilts laterally, up and down, so that the free hip, the one that’s driving forward, is elevated, while the stance side hip, the one that’s driving backward, is depressed.
In addition to the pelvic tilt (vertical), we also see side to side pelvic displacement (lateral). If you watch closely, you’ll see Powell start with daylight between his left side pelvis and the “E” in the background, and then close that gap as the free side hip swings through and begins driving forward.
In Betts, we can see the same thing. Make a note of where his pelvis starts at toe off. Move the video to the pause. You’ll notice that the pelvis has gone from shifted to the right, to now shifted to the left.
We also see pelvic rotation. This is easily visible in the Betts clip. Note the position of his belt loop at the start. Then watch it “swivel” left, or towards his left leg, as his right leg reaches peak height and begins driving down and back, right before foot strike.
In effect, the pelvis is working in all 3 planes in order to propel us forward:
As the pelvis works in a figure 8 pattern, we see the shoulder girdle do much the same, but in the opposite direction.
The Shoulders
At toe off, we see the shoulders of the free hip (the one at max height), tuck down and back as that free hip drives up and forward, in both the Powell and Betts clip:
So in effect, as the pelvis works in a forward turning figure 8 pattern, the shoulders are working in a backward turning figure 8 pattern, resulting in much better utilization of the elastic properties of our midsection.
The Lats
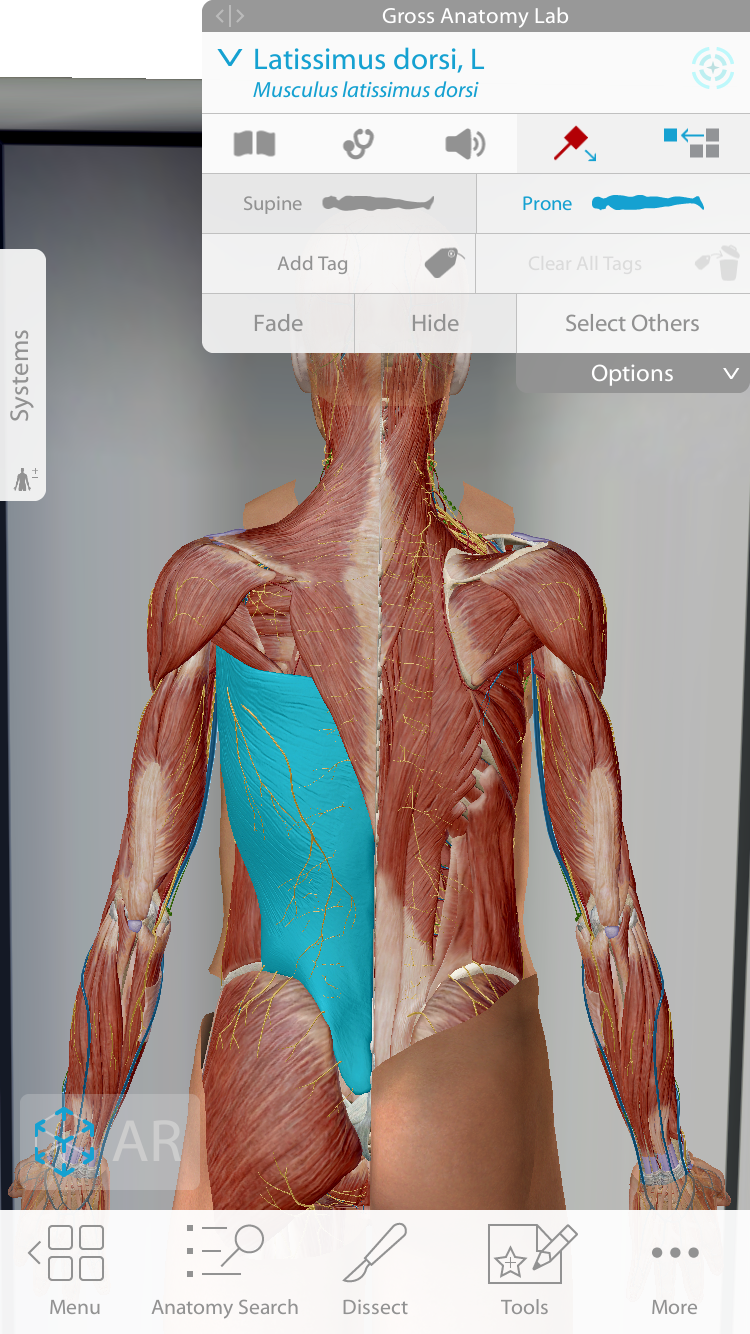
The lats are one of the most powerful muscles in our body, covering most of the backside of the upper body, traveling from the shoulder girdle all the way down to the pelvis. And although the lat isn’t present (it’s hidden) in the following videos, watch the effect torso rotation and lateral flexion of the spine has on the tissues of the torso:
What we’re doing when we use the combination of the forward figure 8 of the pelvis with the backward figure 8 of the shoulders, is winding and unwinding the musculature/fascia that connects the pelvis to the shoulder girdle. This has a profound effect on our ability to move the limbs at higher speeds, coordinate that movement, and ultimately produce greater running speed.
By utilizing these forces, we no longer have to concentrically drive all aspects of the sprint. Instead, we are able to utilize the elastic forces we get from the rotation and lateral flexion, to complement the concentric and isometric actions that take place from acceleration, through top speed.
Repeatability
Here is the remainder of the Powell/Betts clip:
We can see these two figure 8 patterns continue throughout the duration of the run. The reason the first step is so important and was scrutinized in such detail, is that the first step sets the stage for the rest of the run. If we get in rhythm, if we allow the pelvis and shoulders to do their dance and get in sync with each other from the first step, the rest of the run becomes a much easier task. It is simply a matter of modulating the figure 8’s from bigger to smaller, as speed of the body increases and ground contact times become less.
Application
One of my favorite drills through which I introduce this concept to my athletes:
By putting a line directly beneath the athletes center of gravity, we give them some context for where their feet are landing with each stride. By cuing them to stride on either side of the line, we can help them feel what it’s like to use lateral flexion + rotation.
For lateral tilt:
This is one that we actually just began experimenting with. And if you can look past the fact that it looks like something crazy gym goer Joe would use the squat rack for, I think it is massively beneficial in learning how to use and activate the reflexive properties of the lateral bend. Don’t believe me? Try it.
I like to use LBOH MB Throws to sequence the hip driving forward and up while the shoulders drive down and back. By giving the athlete the cue of throwing the ball as far as possible, they’ll start figuring out how to utilize these two actions together to get maximal MB distance.
Finally, I’ve found balancing on both the inner and outer third of the foot beneficial for building respective strength of the arches. When standing on the inside third, your medial arch is forced to do the work, and when standing on the outer third, your lateral arch is forced to do the work.
Conclusion
Improving strength, power, RFD, and other measurable components of training is no doubt beneficial for improving the speed of your athletes. But that’s an article that has been written many times over. What I hope I was able to provide here, was a slightly different lens through which you can view speed development.
Power and force is king in sprinting, yes, but there are multiple avenues through which you can develop those properties, and not ALL entail getting a bigger squat or improving your VBT deadlift jump. By utilizing the body as it was designed to be used, we can take the strength and power we’ve developed with our athletes, and truly maximize that which they are able to display on the playing field.
That’s all for today. Hope y’all enjoyed and were able to make it all the way through! If you have further questions or comments, please direct them to my email at brady@dacbaseball.com.
Thanks for reading, and as always,
Stay Hungry.
Brady