
“Use your legs”! -Coach
“What does that mean”? -Player
“I don’t know, just use them”! -Coach again.

(I don’t know either, Jackie)
What if you were sitting in your ninth grade math class, ready and eager to learn about geometry (unlikely, but stick with me here), and your teacher, on the first day, tells you to do all the problems in chapter 5 for homework and bring them in tomorrow for grading. Said teacher hasn’t taught you anything, just instructed you to bring the problems in, done to perfection. I see two issues here:
- That’s a lot of math problems
- You have no idea how to complete the problems
Coach baseball from above will agree with the absurdity of this story when you tell him, yet he will, many times without knowing it, do the same thing in his own teaching (coaching).
So what does this long introduction have to do with using your legs? I want to provide you with a real picture of what the lower body actually does and how we can better use the resources around us to have better cues and more successfully teach, and train, what we want to have happen. In other words, I want to actually teach you about the concepts in chapter 5 before asking you to do the problems.
Requirements of the Lower Body
NOTE: The requirements of the lower body in pitching are quite similar to those in hitting, but don’t match up completely. I’ll talk more about the added dimension hitting brings at the end of this article.
Requirement #1: Accelerate the body forward
I’m going to get a little nerdy. Here’s a quote from a research paper by Kageyama (2015) and his peers:
“…collegiate highball-velocity pitchers could generate greater momentum by hip extension/abduction and knee extension in the pivot leg for accelerating the body forward”
In less nerdy terms, pitchers who throw harder create more momentum down the mound. What does this look like and what does it require us to do? Let’s take a look.
Here we have Marcus Stroman (video curtesy of PitchingNinja), listed at 5’8 180 lbs, and the inventor of HDMH (Height Doesn’t Matter Heart if you somehow haven’t heard). According to Fangraphs, his average sinker last year was 93.7 mph. He’s doing something right.
For now, lets focus on what he does as he moves down the mound.
The quote from above talked about creating momentum through “hip extension/abduction” and “knee extension”. What do those terms mean?
Hip/Knee Extension and Hip Abduction
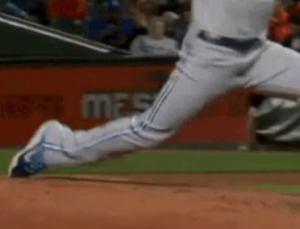
Think about hip/knee extension in terms of the top portion of the deadlift. You start with the bar on the ground, and bring it up, extending the hips and knees at the top of the movement. In the Stroman video from above, hip/knee extension would be maximized at this point:
So hip/knee extension is occurring in the post leg (right leg for a righty, and left for a lefty) as the pitcher is moving into landing. What causes that hip/knee extension? Think about a vertical jump. Hip/knee extension occurs right as your feet are leaving the ground. What do you do before that? A countermovement. During that countermovement you flex (bend) the hip and knee, preparing for the explosive hip/knee extension that is about to occur.
What causes this to happen on the diamond? You have to flex to extend so…
Stroman gets “into his hip” here by doing a couple things.

-knee flexion (angle between lower and upper leg in the sagittal plane- think about it like a squat)
-hip flexion (angle between upper leg and torso- think about hinging in the deadlift)
-hip abduction (distance from the post leg to the midline of his body- think about a lateral lunge)
A Better Way to Coach (the first portion)
So, hopefully by now, you have a better idea of what it actually means to “use your legs” as you move down the mound. Knee flexion, hip flexion, and hip abduction are all integral parts of “using your legs”. Those aspects then lead to knee and hip extension, which ultimately propels the pitcher down the mound and provides the momentum they need to throw hard/harder. How can we use this information to better train the athletes?
Let’s say your pitcher isn’t getting as much hip abduction as he needs to. In baseball terms, this would look like “stalling over the rubber”. Instead of telling him to use his legs more, we could have him do some lateral slides on a slideboard. This way, we can see if he has the ability/knowledge to move well laterally, into hip abduction, and we can also give him a reference when throwing. Remember how you moved on the slideboard? Move more like that. Will it be an exact match? No, but that’s not the point. Now he has some sort of reference for what “use your legs” means, and we can refine his process from there.
The same goes for any of the other issues we may see with the lower body. Your pitcher isn’t getting enough hip flexion as he moves down the mound? Have him do a one legged deadlift so he can feel what that’s like. He isn’t getting enough knee flexion? Have him do a pistol squat. First, see if he has the ability to perform the exercise, and second, he now has a reference for what to do when he throws. Again, these aren’t going to be exact movement matches. We don’t do a pistol squat when we pitch. But, if we can take all the different movements together and blend them into his delivery, then we have something.
Hip Internal/External Rotation
Although it wasn’t touched on in the research article, I want to state the importance hip external and internal rotation can have on our lower half as well.
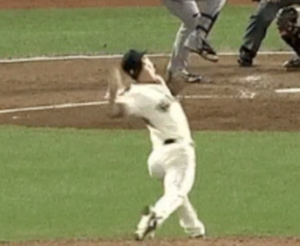
Hip external rotation is rotating our hip out from the midline (think turning your foot outwards) and hip internal rotation is rotating the hip in towards the midline (turning foot inwards). Take a look at Tim Lincecum’s glorious fail here:
Let’s zoom in real quick on his post leg:
We can see his post leg/foot slip out from under him and go into external rotation as he tries “driving” towards the plate.
What he’s really trying to do here is keep that rear hip internally rotated while he works against it with his opposite hip. But his foot slips and he is not able to maintain that tension. So that tells us he is using his rear hip as leverage against the rest of his body, that will ultimately release going into footprint. We see that here (on a successful delivery):
There is no slip of the foot, and he is able to maintain that tension and get full hip internal rotation into footprint, which allows him to maximize the separation between his rear hip and throwing shoulder, as we see here:
(Post leg hip is internally rotated while throwing shoulder is turned back against it, allowing maximum separation of the hip and shoulder)
So as we can see, we need adequate ranges of hip internal and external rotation in order to successfully create the stretch/tension we want to create as we move down the mound. Again, just saying “use your legs” isn’t going to create that. Now that we know what is required, we can assess the athlete and see if they are able to hit the ranges that are needed. If they aren’t able to, we can go about addressing it. If they are, but it isn’t showing up in their lower half, well now we know that too and can go about finding ways to get it to show up.
Requirement #2: Stop the body from going forward (and quickly!)
Requirement #1 was all about what our lower half does as we go from our starting position into landing. Now, we’ll walk about what happens once we get to landing.
To do that, we’ll start with another nerdy quote, also from Kageyama and his peers:
“…suggested that the landing leg serves as an anchor in transforming the forward and vertical momentum into rotational components”
Everything in requirement #1 was about creating momentum, now we need to stop it. There are several aspects that go into this. First a clip showing the requirement #2 portion of the Stroman video we’ve been using:
Here we see that as soon as he lands, the front leg stiffens, and even straightens a bit, allowing his lower half to be completely stable and giving his upper half something to work against. He has already created the momentum, now he needs to be able to redirect it up into his upper half. What do we need to do this?
#1: Quadriceps Strength
The quadriceps are what allow us to put on the brakes. Think about the deceleration portion (lowering portion) of a forward lunge. Yes, all muscles in the leg are working to handle the load, but the quads have the biggest responsibility. When you land, the quads will be doing the majority of the work in resisting forward momentum and “pushing back” so the upper half can work over top of it.
#2: Hamstring Strength/Mobility
In order to put on the brakes effectively, we must have enough range of motion, and stability in that range of motion, to be able get in good positions that are conducive to good front leg blocking patterns. What does that look like? It requires a lot from our hamstrings:

Our hamstrings must be able to first get into this position, which requires a good amount of mobility, and then be stable there, which requires a good amount of eccentric strength.
#3: Internal Rotation Strength and Mobility
We already discussed the need for internal rotation in the post leg, but it turns out it is needed in the landing leg as well. As your leg comes down into landing, it needs to be able to resist rotation so the upper body can have something to rotate against. If our lower half is still rotating after landing, that takes away the speed the upper half is going to be able to rotate with. Think about it like this: if a figure skater was doing a spin on the ice, what would happen if they suddenly dug their skate into the ground? Their lower half would stop rotating and the upper half would speed up, so much so that they’d probably fall over and seriously injure themselves. We don’t want the injury, but we do want the part where the rotation of the upper half speeds up. Maintaining internal rotation of the lead leg helps us do that.

(Chapman maintaining internal rotation of his front hip)
Once again, we can now apply this information in the training of our athletes. First, do they have adequate internal rotation mobility and strength? If not, we can work on that with exercises like this:
If they do have the strength/mobility but it’s not showing up, we can then work to find ways to integrate/blend it into their actual hit/throw training, and effectively transfer it that way.
Wrap-up
Congrats if you’ve made it this far. I’ve decided to make a part 2 to discuss the lower body in hitting, as nearly everything here was about throwing and hitting represents many of its’ own challenges. Look for that in the future.
As for this article, the key points are as follows:
- There are 2 requirements of the lower half: momentum creation and blocking of that momentum.
- Hip and knee flexion as well as hip abduction are integral in requirement #1.
- Quadriceps strength, hamstring strength/mobility, and hip internal rotation strength/mobility are integral in requirement #2.
- The phrase “use your legs” is useless when trying to create the movements mentioned above.
I hope I’ve been able to help you better understand what the lower body actually does when throwing a baseball. Thanks for reading and if you liked this article, be sure to check out part 2 when it comes out!
References (Apologize for the formatting. Would not allow me to tab over).
Kageyama, M., Sugiyama, T., Kanehisa, H., & Maeda, A. (2015). Difference between adolescent and collegiate baseball pitchers in the kinematics and kinetics of the lower limbs and trunk during pitching motion. Journal of Sports Science and Medicine, 14(2), 246+. Retrieved from http://0- link.galegroup.com.eaglelink.cornerstone.edu/apps/doc/A500969395/AONE?u=lom_cornerstc&sid=A ONE&xid=2f338fc5